Overview
 AutoGrade is an online software solution that utilizes deep learning to automatically grade handwritten tests. Recently selected as the official grading system of Stellenbosch University, South Africa, the software enhances its accuracy and capabilities over time through increased grading. It currently supports multiple-choice answers and handwritten numbered answers. Our primary focus is to collaborate with educators to expand the software's capabilities to accommodate new use cases, including processing words, mathematical expressions, and more.
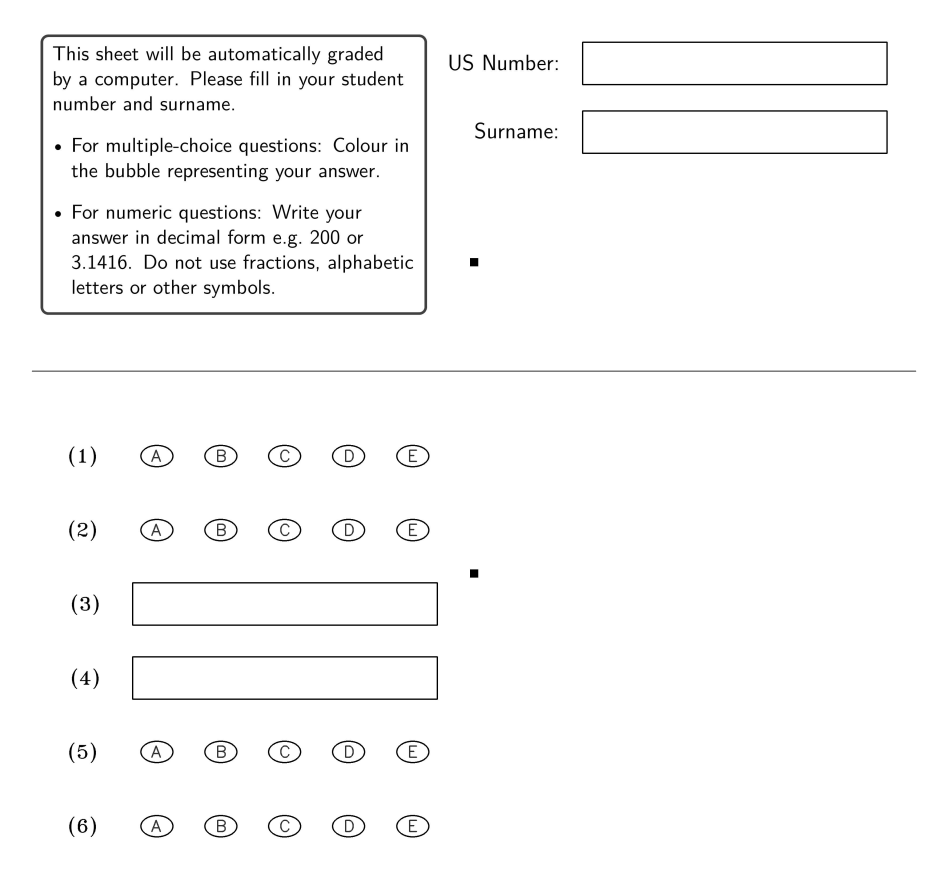
An illustration of a custom cropped-out template is visible on the right, where questions 1, 2, 5, and 6 are multiple-choice answers, and questions 3 and 4 are for handwritten decimal number answers. The system operates through three distinct phases: template creation, grading, and review.
AutoGrade is an online software solution that utilizes deep learning to automatically grade handwritten tests. Recently selected as the official grading system of Stellenbosch University, South Africa, the software enhances its accuracy and capabilities over time through increased grading. It currently supports multiple-choice answers and handwritten numbered answers. Our primary focus is to collaborate with educators to expand the software's capabilities to accommodate new use cases, including processing words, mathematical expressions, and more.
An illustration of a custom cropped-out template is visible on the right, where questions 1, 2, 5, and 6 are multiple-choice answers, and questions 3 and 4 are for handwritten decimal number answers. The system operates through three distinct phases: template creation, grading, and review.
Template Creation
A template can be create in the Template tab (top right of the screen). This tab becomes visible once you have created an account and logged in. In this tab, you specify how you want your test to look, or download templates you already created. To generate a template, simply specify the template name, types of questions (multiple choice or numbered) and lastly, the number of answers sets with unique answers. You can therefore choose to use more than one answer set to try and prevent students from copying each other's answers. Once you are done adding all the questions (Add button) you can finish your template design by clicking on the Generate button. Up to 100 answer fields (20 for numeric answers) can be added per template.
For multiple-choice questions, one can specify anything from 2 to 5 possible answer bubbles (A-E) per question. Students can fill in these multiple-choice answers by colouring in the correct answer. They can also correct their answer by crossing out the incorrect bubble and colouring in a new bubble. For handwritten answers, students can write numbers, in example, "3.1415" or "-200" inside the answer field (rectangular black box). Any writings outside the answer field will be ignored. A student can correct their handwritten answers by crossing out the incorrect answer and writing the correct answer next to it (still inside the answer field). Otherwise, Tip-Ex can also be used.Grading
After creating a template, download it from the Template tab. Students should fill out their student numbers, surnames, and answers on the printed tests. Important: Use high-quality settings for both printing and scanning. Ensure there is no warping, and the black block markers on the document are fully visible and not pixelated or cut off. Scan the sheets using either a black and white or color scanner at a minimum quality of 300 DPI to ensure the system can processes them correctly.
Upload the completed tests through the Grade tab. Here, you will need to provide the test name, template name, student information, images of the tests, and the correct answers. For 'Enrolled students,' upload a .csv, .txt, or .xlsx file with one column for student numbers and another for surnames. Under 'Answers,' enter the correct answer for each question. You can also link answers with equations, a feature explained in the Help section of the Grading tab. When ready, click the 'Grade' button at the bottom of the page to start the automatic grading process.
Reviewing
The Dashboard tab provides you with an overview of all the tests and where they are in the grading process. The tests will be in either the 'Autograding', 'Inspection', 'Finalising' or 'Ready' status. In the 'Inspection' stage, the viewer can be used to correct any mistakes the system has made. Here an individual student's test can be searched for by surname or student numbers. Once all the tests have been inspected the system will change the test to the 'Ready' status. At this point, the 'Results' and 'Images' buttons can be used to download your results and the sorted images. You can also delete tests if needed. There is an additional Help button on the Viewer page for further information on its functionalities.System Training
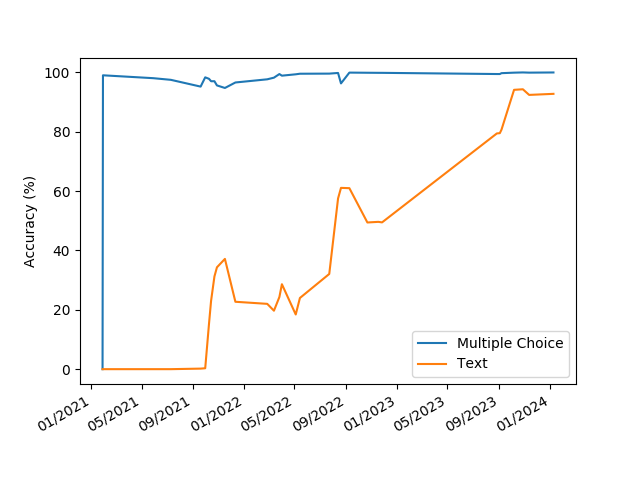
The system is trained on an anonymised dataset of handwritten text, extracted from previous grading sessions. This dataset is updated every time a user corrects a mistake made by the system. We then retrain the system on new data every few months to improve its accuracy. Therefore, it's vital to try and spot as many mistakes as possible, as incorrect labeling significantly impacts the learned accuracy. One can also specify tests that should not be used for training by labeling them as 'Don't use as data.' Below is a graph displaying the system's accuracy over time, where 'Text' represents numeric answers. Any answers the system is unsure about it asks a user to verify.